Pages

Wednesday, July 13, 2011

Starting on my Rosemary! - AND, i reached my goal of php1000 sales within one day!

I've been getting quite a lot of inquiries for Rosemary. Sadly, I've had no luck in growing from seed. It's not that it doesn't live.. it just takes FOREVER to grow!

Here in Cebu, the demand for rosemary plants is quite high, and I find myself desperate to get a plant as well. Just one would be great! I've had no luck looking for some in the grocery stores, they've usually run out of stock when i check.

BUT with much effort, i finally got a friend to give me a few cuttings. She was fairly hesitant to since she was afraid that the plant would die if you take cuttings from it. After  showing her a few videos of other gardeners trimming their rosemary, she gave in and i got a whopping bunch of rosemary! Ofcourse, i had to pay her about php100 for all the cuttings, but it was well worth it!

I'll be putting them into the hydroponic system to root for a week and i'll start adding it into my catalougue of "herbs for sale".

Time to get these babies to root! SOO happy!

Bundle of rosemary cuttings

Bwahaha! who would've thought that i would be able to snag this many?


Another surprising thing is many people have been buying my herbs for the past few days. I just suddenly had an inflow of orders coming in. Within 3 days, i was able to make a sale of over php1000 with one order being php1040 already! *gasp*

I feel a great deal of accomplishment when i see people appreciate my hard work and effort that my plants display through their beauty and health.


Thanks so much, and i look forward to more orders soon. :)


Ulyssa

Wednesday, July 6, 2011

Sprouting my seeds!

My very first batch of lettuce, was in January 2011, but I shouldn't take all the credit for it. I actually bought 2week old lettuce sprouts from DOST (department of science and technology) since i thought it'd be faster that way. Of course, nothing beats growing your own lettuce from seed! You feel that great achievment when they look fresh and crisp, and when someone admires it, you know that all the credit goes to none other than yourself.


SOWING SEEDS - Coco choir or Vermicompost? 
Around mid January, I started sprouting my own seeds - now, having no experience what so ever with seed germination, I simply threw in a few seeds in coco coir and waited. Coco coir is natural fibers taken from the husks of a coconut husk. This is commonly used in many potting mixes and can be found in most gardening sections of hardware stores. Coco coir is a good medium to use since it keeps moisture in longer than soil and its entirely organic, so it gives extra nutrients to the plants. Not to mention, it's easy to handle and not messy.

However, I wanted things to move faster. So I ventured into Vermicompost. This is another growing medium purely made of poo (deposits) from worms that eat compost (rotten leaves/vegetables, manure, etc). I was able to get some from my school mate who I shared a booth with in Ayala USC Business Enterprise Exhibit. And the results were drastic!

In coco coir, within 7 days, sprouts were approximately 3-4cm high and had 2-3 leaves. In Vermicompost, within 7 days, sprouts were 5-6cm high and already had their 4th leaf, begning on their 5th. They were significantly fatter and greener than those grown in Coco coir.

So in my personal experience, VERMICOMPOST RULES! 
If you do plan on using vermicompost, you can contact me - since i also sell some for those who are interested, at php15 a kilo.

SPROUTING SEEDS - in clusters or in individual cups?
CLUSTERS:
If you're the type who likes to conserve space and growing medium (soil, vermicompost, cococoir, etc), then I'd suggest that you grow them in clusters.

My first try at sprouting my seeds were in clusters. I continued this habbit from January to March. This is when you vertically plant seeds into a container of growing medium and let them sprout. When they're big enough (about 2-3 leaves), then they are transplanted to individual cups and into the soil, or in my case, my hydroponic system.

Advantages -

  • Save space : since you get to cluster all the sprouts, you wont need too much space as compared to growing them in cups where one sprout = 1 cup.
  • Save growing medium (temporary) : Why temporary? Because you'll eventually have to transfer them into individual cups when they're big enough. But for the mean time, you only need about 1-2 cups of medium to sprout about 50 seeds. Growing it in cups, you'd need 1 cup of medium per seed. 
  • Germination rate : if 15 out of 50 seeds don't sprout, then it's alright. Since you have 35 sprouts to take note on, where areas, if you sow one seed per cup, you aren't sure that that one seed will sprout.
  • Easy watering : you only need to get a sprayer and spray it over the containers. If in individual cups, you'll have to be moving to every single cup and placing water in each one (trust me! it's tiring)
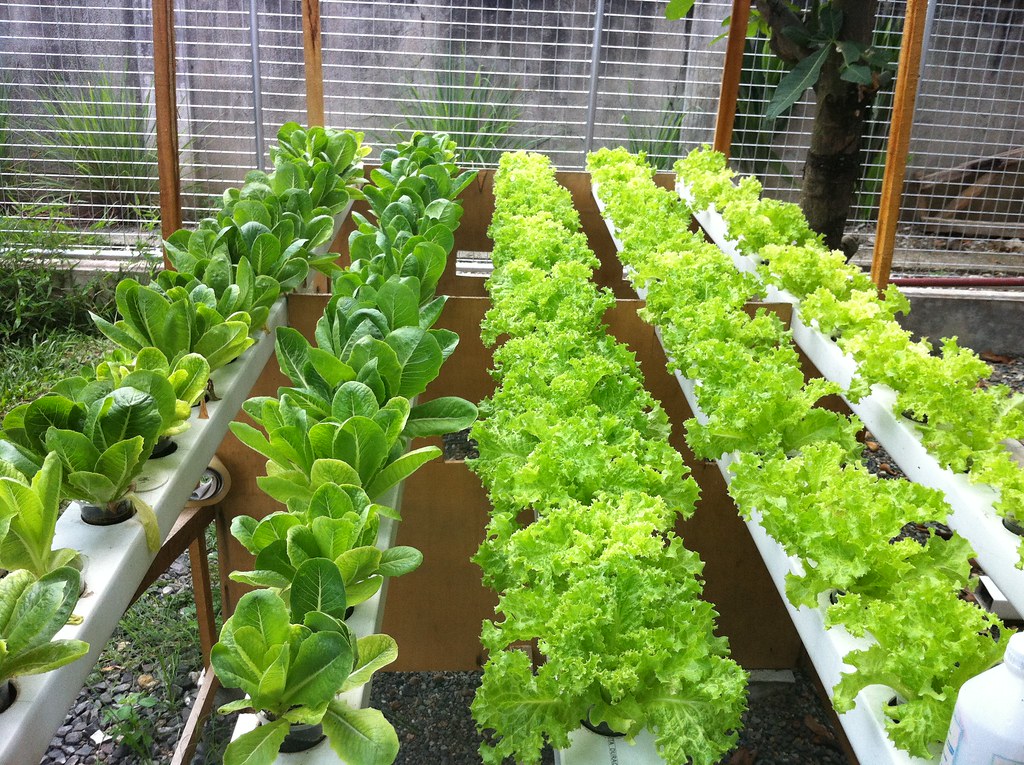
Below, is a picture taken earlier this year (approx. February) when i planted my lettuce sprouts in clusters.
Several types of lettuce sprouts: lollo rossa, romaine lettuce, loose leaf, grand rapids and correlle lettuce in clusters.
Medium used: Vermi compost
Conatiner: recycled Jolibee take-out containers I rescued from my trash can. I pierced a few holes on the bottom for drainage.

Growing in clusters may have its advantage, but there is one major disadvantage that it does have. 
When the time comes to transplant the sprouts, the roots are all tangled with each other and breaking them apart would mean to a shorter root system for the plant to thrive on for the next few days. Thus, the plant focuses on growing roots rather than growing leaves. And that leads me to the second way of sprouting seeds --- 

IN INDIVIDUAL CUPS:
If you're like me, who's impatient and too lazy to keep transfering sprouts into cups after a while, then you'd love this method. 

Since the seeds are already into their cups, there is no more effort in transplanting after 15 days. Just pop the cups into the hydroponic system or into your home garden pots when they're big enough, and tada!

One advantage that I did consider in this method is:
You do not rip out any roots.

Since the plant is left alone and no longer tampered with, the roots are free to grow as long as they way, rather than compete with each other and tangle. In this way, the plant can still continue focusing in growing above the ground after transplanting rather than trying to rebuild it's lost roots, which usually happens in growing in clusters (as mentioned above).In other words, the plant can grow faster. 

I started growing plants in cups after March and i've continued this method ever since. Below is a sample of the plants in their cups (about 6 days old and 15 days).

Please excuse the mess - this is my work station, which  i dont tidy up very often. :p

Romaine Lettuces - no need to transplanting into cups anymore. Just pop them into the system and wait till harvest.
ENVIRONMENT CONTROL:
- You must keep your seedlings away from harsh sunlight in the times from 10am-3pm. They tend to wilt, dry up or die from too much heat. 
-PROVIDE SUNLIGHT! This is very very important! If you want short , fat, and healthy sprouts, they must have sunlight. If they don't get enough sunlight, they will grow tall, with thin stems. This is their way of searching for sunlight. If this happens, after some time, they will topple over and break every time you water them or even spray them. 
Also, if they don't have enough sun light, they will be pail and frail. Sunlight is an important element in producing chlorophyll to keep your plants lush and green. 
-Don't forget to water!  One of my biggest mistakes is that i sometimes forget to water them in the morning. the sprouts need to be watered 2x a day - early morning and late afternoon. They need the moister and as much humidity as they can. If not, the heat will evaporate even all the moisture within the medium, it'll start to crack and your plants will wilt and eventually die. 
-Some people grow their seeds indoors. This is a good idea since they aren't at risk of any pests or harsh heat. Just make sure that you have a light bulb to supply light until you transfer them outside, or keep them near a window.

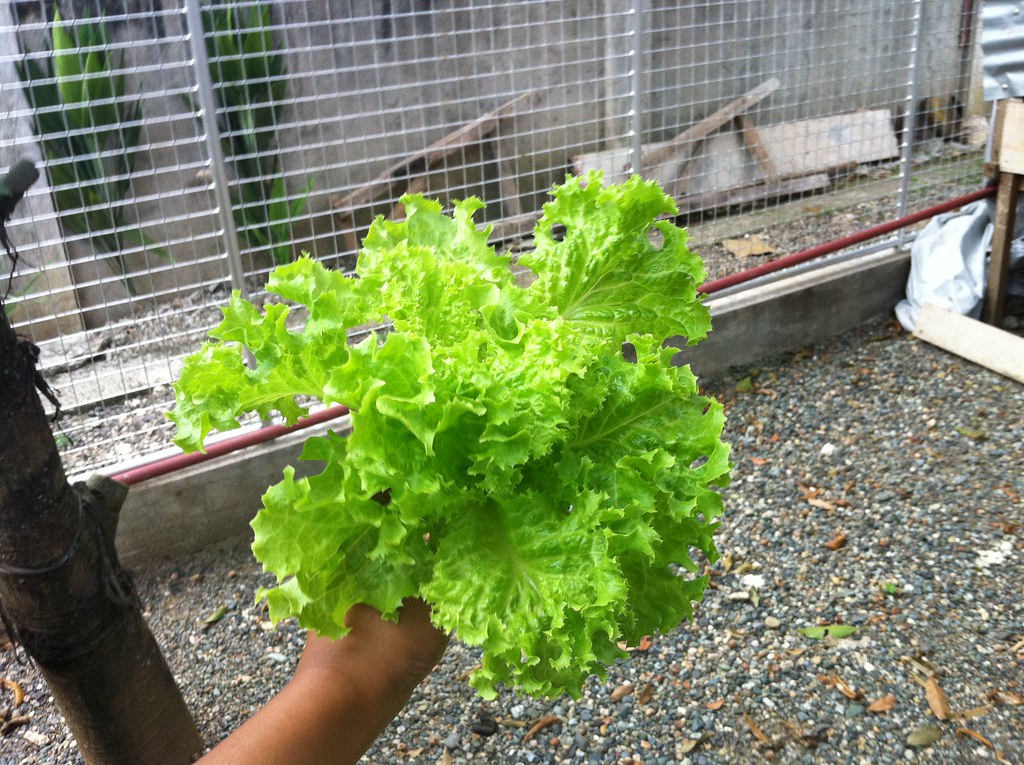
Below, ill show you some of the results from how i've treated them, and how well it's worked out.


So based on my own personal experience, i'd vote for growing in individual cups. But to you, and to anyone who has their own garden, i suggest any method that you feel comfortable with and confident with. Remember, it's your garden and you grow it based on your preferences and no one else. I'm just here to share my experiences in hopes that you might find it useful in your own gardens. :)

'Till next entry!


Ulyssa

Monday, July 4, 2011

Propagating through cuttings -- growing from seed needs time, but cuttings need lesser the time!

YOU NEED TO BE PATIENT- plants need you to be...
Being only 20 years old, I must admit that I have a very very short patience. Then again, we all do! haha
So I can understand the frustration of having to wait for plants to grow from seed.

I recall the first batch of seeds I ever sprouted were Thai Basil. I buried them in Cocoa Coir and watered them daily. They took about 5-6 days to sprout! I would go out each morning to see if I could see small green stalks, but to my disappointment, i'd see none. The first sprout I saw was at night, when i arrived home from my school's  Ayala Exhibit in which The Hydro Garden participated in for 3 days. My mom could hear me screaming. "It's growing! It's growing!" like a little child full of fascination.

But of course, plants need time & care (maintenance) but most of all, it needs its grower to stay patient. However, i couldn't afford the time then. This was foremost a school project and my department pressured me for updates on sales and progress. To me, progress meant the growth of my plants and the life of this venture, but to the department, progress meant "money", more specifically, income.

That's when, in a panic, I studied and researched of different methods to reproduce plants. Now, there are many ways to do this, but I found a cheaper and more efficient way to do it -- through cuttings!

PROPAGATING THROUGH CUTTINGS:
--This is the act of cloning the mother plant through its branches that are cut off and set to root on its own.

You can find many sites on tips of how to propagate through cuttings. Mind you! Not all cuttings root! There is a chance that the cuttings rot or die from other variables before it roots, or is not under the right rooting technique.

Many people use a rooting hormone , which is a liquid/gel and/or powder which covers the bottom of the cutting before being placed in the soil. This substance encourages the covered tip to grow roots. However, in Cebu, with much effort I have not yet found a rooting hormone.

The most common and cheap way of rooting a cutting is:
          a) in water
          b) in potting soil/mix inside a humidity dome


I have tried both methods and never had a high success rate. Not all plants will root through these methods. I was frustrated and puzzled.

HYDROPONICS - success in rooting!
I then experimented with my hydroponic system. I have several hundred basil growing and it holds all my mother plants. I kept a few plant slots available for my cuttings. I WAS AMAZED! I first started out with Thai Basil Cuttings. The cuttings rooted within 5 DAYS! In water, Thai basil cuttings need 1-2 weeks before they reach a certain stage enough to plant into the pots. But the flowing water and organic solutions I use in my system promoted a faster rooting stage.

Thai basil cuttings rooted in Hydroponic System in 5 days

5 day roots in Hydroponic system
Basil is known to root very easily. But i was rather shocked to see the result in just 5 days. They all have rooted and not one of them had rotted or wilted. I wanted more results! I wanted to try the impossible. 

ROOTING "DILL" CUTTINGS:
Dill is a wonderful plant used in many recipes. Take note: dill and fennel look very much alike, but they are the same. Below is a picture of how dill leaves look like.
sample: dill plant


Dill is known to grow only from seed and not from cuttings. Many other hobbyist say that it is impossible to root in water or in soil since it rots or wilts eventually.

I have tried rotting it in water, but of no luck, it did eventually rot and die.

However, since my hydroponic system did such a good job on my basil, i thought, "why not try the impossible?". I put a few cuttings from my dill plant, bunched them together and placed them in an empty slot of the system.

In 5 days, no luck. I didn't see any roots -- BUT! They were still alive. This is a good thing. It must mean that the possibility of rooting is present.

After 7 days, SURPRISE! It actually started to root.


Dill cutting rooting after 5-7 days!

5 days
7 days
ROOTING MINT CUTTINGS:
Mint is quite an invasive plant. Rooting them in soil won't be a problem. it would take about 7 days or more before u see it growing on its own. Within 4-5 days, the mint cuttings i took from the mother plant began to root in the system as well! whew! I'm on a roll!

Rooting Mint cuttings

wooh! it's rooting! success!
ROOTING TARRAGON CUTTINGS:
Tarragon is one of the biggest headaches i've had to grow really. They're not hard to manage, but they are hard to reproduce. They rarely sprout from seeds and they die if rooted in the water or soil. I put them into the system and after 7 days, still no roots. BUT, they are still alive. I have yet to see if they will root. In the meantime, i'm glad to observe that they have not rot or wilted.

They're still alive, thankfully. :D
I am to conclude that my hydroponic system is doing me well, aside from making my other basil grow beautifully, but i am not able to reproduce plants faster and easier. 

This is it for today, 'till next entry!

Ulyssa


My Organic Herbs - Basil, Sage & Mint

BASIL

I've been growing Basils since January, 2011. I first started off with Thai Basil since their seeds were the only ones I could find. I grow them in pure Vermicompost until they reach 1 month old, then i transfer them into larger pots of mixed vermicompost, compost & animal manure. The compost is from the left over leaves of vegetables I grow or cook, and the animal manure I purchase from the market (about php60 a sack).

Below, is a picture of the very first thai basil that i grew. Right now, they are 5 months old. I refer to them as the "Mother Plant" since i take all my cuttings for propagation from them.
5month Thai Basil growing in my hydroponic system


I started growing Sweet Basil in mid March. It took my a while to find the seeds for these. I had to get them shipped from Manila, but it all worked out. I got a good bunch that sprouts after 1-2 days in cotton before I put them in the vermi compost cups. So far, they're excellent! I take cuttings from then every 2 weeks and make replicas which eventually root within 5 days. I'd have to say that sweet basil is my favorite of all my herbs.


I'm absolutely amazed at hoe big their leaves can grow!

3 month old Sweet Basil


I also grow several other types of Basil such as Purple Basil & Dwarf Basil. I have to say that they are my favorite to propagate. They root so easily without any effort really. They're shorter and smaller than the Thai and Sweet basil, but they sure do make the garden pretty.

Dwarf Basil

Purple Basil

Purple Basil

Purple Basil (top), Dwarf Basil (bottom) 
Aside from my lovable basil, I also grow Sage, Dill, Mint, Tomatoes, Peppers and Tarragon.
3 month old Sage

3 month old Sage

15 day old Green pepper sprouts awaiting transplant

Propagated Aqua & Java Mint

Aqua Mint - gotta make sure they're in pots!

15 day old tomato plant 
And that ends my introduction of the plants I grow. I do sell these plants, the prices are below:

Basil Plants (sweet, purple, dwarf & Thai):
- below 1 month : php25
- 1 month : php40
- 2 month : php50
- 3 month : php80
- 4 months above: php100-150

Sage: php 80

Mint (java & aqua):
-propagated (small-medium): php40
-In pots (large): php80

Dill: 
-Medium: php50
-Large: php100

Tarragon:
-Medium: php50
-Large: php100

It's really hard to find Fresh potted herbs in Cebu. They usually sell the herbs in the supermarkets, but they're either withered or not as flavorful anymore. There are some malls that do sell the herbs, but my gosh! You will faint from their prices.

So fellow Cebuanos, If you're ever in need for cheap, fresh potted herbs in Cebu, message me at my website: http://facebook.com/The.Hydro.Garden  

Sunday, July 3, 2011

Myself and my lettuces

As my first blog entry, I shall start off by introducing myself and my little ones that I've been growing for quite some time now.

First of all, my name is Ulyssa Marie Torbiso. I am 20 years old (this age would vary depending on when you are reading this :)) and I am a Business Administration Student. It's part of our course to start up a business throughout our 4th year and see it through till graduation. The business I ventured into is Hydroponic Gardening.

One would ask, why this? It's not every day that you find a person within my age range in the Philippines who is engaged into this activity. Honestly, when I proposed this project to the panel (Nov,2010), it was merely an a fascinating topic to me. I had no hands on experience on how to deal with plants, nor with hydroponic systems. In fact, I hadn't even seen an operating system. In other words, I'm what you call a complete 'noob' at this (a slang term used to refer to persons who are beginners or amateurs).

I have started growing my produce since January; mind you! I went through countless of trial-and-errors in order to get a stable system, or even get quality results. Many were failures and some, who had grown till old enough to harvest, didn't have the quality that you'd find edible.

But finally, I have maintained a stable system that produces excellent produce and I must say, that I am proud of myself. Hydroponic materials are difficult to source-out in the Philippines, and even with the great headache that has caused me, my plants are looking well.

Enough about me, I shall introduce my produce!

LETTUCES!
As a beginner, it was always suggested to start off with growing lettuce. To tell you honestly, these guys are fast to grow (30-40 days), however, they are extremely sensitive! They drive me up the wall! Haha, they react to almost every variable around them, may it be the nutrients, the water content, the heat, the humidity, the amount of sunlight... *sigh*, you name it!

Thankfully, i've gotten used to growing these babies. It took me 3 months to figure out a stable way to produce them efficiently.


Now, these were my first success! I've had previous good batches but they weren't as green, crisp or LARGE as these ones. These lettuces were in the system for about 3 weeks after transplanting (10 days from sprout). I'd have to say, that they're looking well.

This ends my first introduction. My next entries will introduce my culinary herbs and the different hydroponic systems that I have around the garden.


Ulyssa